Struggling to price arches & garlands? This NEW simple calculator does the math for you.
- Home
- Valentines Gift Idea
Unique Valentine Balloon Gift Ideas for DIY Lovers
Surprise Your Sweetheart with a Homemade Valentine's Day Gift That Won't Break the Bank
Let me show you two unique Valentine balloon gift ideas that you can easily make yourself.
The first one is a classic, helium filled Valentine balloon bouquet with a floral base. Even if you've never worked with balloons before, you'll achieve a stunning result — pinkie promise.
The second example is an air-filled balloon centerpiece using a MaxiCup pole. With helium being in short supply and rather expensive, this design is ideal for you if budget is tight.
DIY Valentine Balloon Bouquet
Created in six easy steps, this Valentine Balloon Bouquet is one of the best personalized Valentine's Day gifts you can give to that special someone.
You can't give the same bunch of flowers or box of chocolates year after year, can you?
If you make a purchase through a link on my site, I may receive a small commission at no extra cost to you. I only recommend products that I believe to have good value (affiliate disclosure).

Here's What You Need for this Valentine Balloon Bouquet:

- 3 x 11" high quality white latex balloons,
- 1 x 18" red mylar heart balloon,
- white curling ribbon (5mm wide),
- white tulle (50mm / 2 inches wide),
- sticky tape,
- helium,
- balloon sizer (self made or bought),
- your pre-prepared floral base and
- optional: paper doylies
Step 1: Preparing your Mylar Heart Balloon
Take 150cm length of white curling ribbon. Measure 100cm and at that point fold it back over on itself, leaving the remaining 50cm for curling. Take 5cm of sticky tape and apply it to the folded section of ribbon (fig. 1).
Carefully attach it to the neck of the heart balloon, on the opposite side to the self-sealing filling valve (fig. 2).


Step 2: Inflating the Heart Balloon
OK, let's start blowing up the balloon with helium. Gently insert the nozzle of your 'filling station valve' into the opening of the balloon self sealing valve (fig. 3). As you do this, take care not to use too much force in case you tear the mylar.
Keeping a firm grip with your thumb and index finger, begin inflating the balloon. The type of valve we are using here is commonly called a 'Quick Fill Station'. It works simply by applying downward pressure to the black flexible section.
If you've never used one of these before, press it down very gently so that you get a slow, controlled release of the gas.
Continue to blow up the balloon until it begins to feel firm (fig. 4).


Step 3: Attaching the Heart Balloon to the Base

Tie the balloon ribbon to the nylon line of your pre-prepared base with two securing knots (fig. 5). The height of the heart should be roughly 80cm to 100cm.
Step 4: Preparing the Latex Balloons
Take the first of your white latex balloons, slip its neck gently over the valve of your 'filling station' and begin inflating (fig. 6). When the balloon is filled approximately to its optimal size, check it using your balloon sizer (fig. 7) and inflate or deflate as required.
When the balloon is the correct size then you tie a knot. Check out our "Tips & Tricks" for an easy and quick way make a balloon knot.


Step 5: Attaching the Ribbon
Cut about 1.5 m of ribbon. Leaving half a meter spare, tie it in front of the balloon knot (fig. 8). Tie a second knot to attach the ribbon securely.
Pass the other end of the ribbon under the nylon line on your base. Adjust the height of the latex balloon until it is just touching the underside of the mylar heart (fig. 9). When you're happy with the positioning, tie the ribbon to the base with two securing knots.


Repeat steps 4 and 5 for the remaining two balloons. When finished, the three latex balloons should be sitting at an even height (fig. 10).
Your masterpiece is almost complete. So, let's move on to the finishing touches.
Step 6: Add the Finishing Touches to your Valentine Balloon Bouquet
We need to tidy up the curling ribbon on the base. So take your scissors and trim the excess as close to the knots as possible (fig. 11).
Next, curl the loose ends of the ribbons at the balloons. To do this you take an open pair of scissors. Starting at the knotted end, place the ribbon between your thumb and the blade edge and then pull the scissors down the entire length of the ribbon.
Try not to grip too tightly as you'll make the curls too tight (fig. 12).


Take about 60cm length of white tulle and tie a decorative bow around the ribbons just above the plant (fig. 13). To add a final delicate touch, place your balloon bouquet on a doylie as shown in our example.
That's it! Told you that you can make this Valentine balloon bouquet with ease!


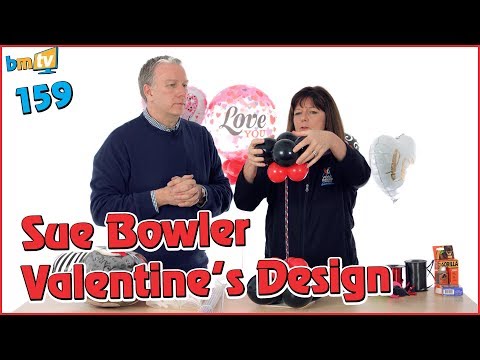
Valentine Balloon Gift Idea #2: Air-Filled Balloon Centerpiece
 Sue Bowler and Greg Brown demonstrate how to create an air-filled Valentine themed balloon centerpiece.
Our second DIY Valentine balloon gift idea doesn't require helium. It has a longer life-span than the bouquet and — thanks to the excellent video tutorial by Sue Bowler (see below) — you shouldn't have any problems creating it.
Materials for the Valentine Balloon Centerpiece
- 18 inch mylar balloon heart in a design of your choice
- 16 x 5 inch latex balloons in two colors (e.g. red and black as in the tutorial video)
- MaxiCup II balloon cup and stick
- Gorilla Glue
- stretchy balloon tape
- curling ribbon
- tile
Good to know: Start preparing the centerpiece one day ahead. The Gorilla Glue you use to attach the pole to the tile needs 24 hours to harden properly. You'll hear more in the video.
There you have it! Two beautiful Valentine balloon gift ideas that you can easily create yourself.
Would love to know which one you're going to try. Let me know in a comment!
If you make a purchase through a link on my site, I may receive a small commission at no extra cost to you. I only recommend products that I believe to have good value (affiliate disclosure).
Recent Articles
-
What are the best suggestions for mounting balloons onto walls and ceilings?
 Increasingly, venues are getting strict about the way balloons and other decorations are fixed onto walls and ceilings. Understandably so, since these
 -
How to get small balloons into a larger balloon
![Colorful balloons inside a clear balloon [Image source: balloonsforyou.ie]](data:image/svg+xml,%3Csvg xmlns='http://www.w3.org/2000/svg' viewBox='0 0 150 111.75'%3E%3C/svg%3E) Hi! I've been asked to fill four large clear balloons with confetti and smaller balloons. I don't have a balloon stuffing machine so looking for any advice
Hi! I've been asked to fill four large clear balloons with confetti and smaller balloons. I don't have a balloon stuffing machine so looking for any advice -
How to Start a Balloon Business from Home
 Want to start a fun and rewarding balloon business from home? Set yourself up for success with the best training resources. Includes free tutorial on pricing.
![Colorful balloons inside a clear balloon [Image source: balloonsforyou.ie]](/image-thumbnails/how-to-get-small-balloons-into-a-larger-balloon-21890291.jpg/default.webp)
